
How to Use Pimple Patches in Your Skincare Routine
VEILTA
09/16/2025
Most people put pimple patches on wrong. Not dramatically wrong — just in the wrong order, or over moisturizer, or for two hours instead of eight. The patch does nothing, they write it off, and move on.
The fix is simple. This guide covers exactly where pimple patches fit in a skincare routine, why the order matters, and what to do if yours aren't working.
A pimple patch applied to clean, dry skin before any other products — the only way the hydrocolloid can make contact with the blemish.
Quick answers
- Pimple patches go on before moisturizer — on clean, dry skin
- Leave on for 6–8 hours minimum; overnight works best
- The patch turns white when it's working — that's fluid absorbed from the blemish
- Not sticking? Skin wasn't dry enough, or you applied product to the area first
How pimple patches actually work
Pimple patches are made of hydrocolloid — a moisture-absorbing material used in wound care since the 1980s. When you press one onto a blemish, it draws fluid (pus, sebum, exudate) out through osmotic pressure, flattens the spot, and puts a physical barrier between the wound and outside bacteria, which also stops you picking at it.
Clinically, hydrocolloid dressings reduce healing time by up to 40% compared to leaving a wound exposed (Journal of Wound Care, 2021). That's the mechanism behind every pimple patch on the market — the format differences come down to thickness, active ingredients, and whether there are microneedles involved.
It's simple and it works — but only when the patch is sitting directly on skin. Put anything between the patch and the skin surface, and the hydrocolloid can't absorb anything.
This is why order of application matters more than most people think.
Where pimple patches go in your skincare routine
The correct order:
- Cleanser
- Toner (optional — water-based, fully absorbed)
- Pimple patch ← here, on bare skin
- Serum
- Moisturizer
- SPF (morning) or facial oil (evening)
The patch goes on third — after cleansing and toning, before everything else. Once it's on, continue your routine around it. Serum, moisturizer, and SPF can go on the rest of your face as normal. Just don't layer anything directly over the patch.
| Step | Product type | What it does | Notes for best results |
|---|---|---|---|
| 1 | Cleanser | Removes sweat, oil, sunscreen, makeup | Double cleanse at night if you wear heavy sunscreen or makeup |
| 2 | Hydrating toner/essence (optional) | Adds water and slip | Skip if it feels redundant or causes pilling |
| 3 | Treatment serum | Targets concerns (vitamin C, niacinamide, azelaic acid, peptides) | Use one primary treatment per routine when starting |
| 4 | Targeted actives | Retinoid, exfoliating acid, acne treatment | Many work best on dry skin to reduce irritation |
| 5 | Moisturizer | Supports barrier, reduces water loss | Choose texture by climate and skin type |
| 6 (AM only) | Sunscreen SPF 30+ | UV protection | Apply generously as the last skincare step |
| 7 (optional) | Makeup | Coverage | Let sunscreen set first to reduce pilling |
Skincare routine flatlay showing products in correct order — cleanser, toner, pimple patch, serum, moisturizer, SPF — with the patch positioned before moisturizer
The correct routine order. The patch sits between toner and serum — not at the end after moisturizer.
Step-by-step application
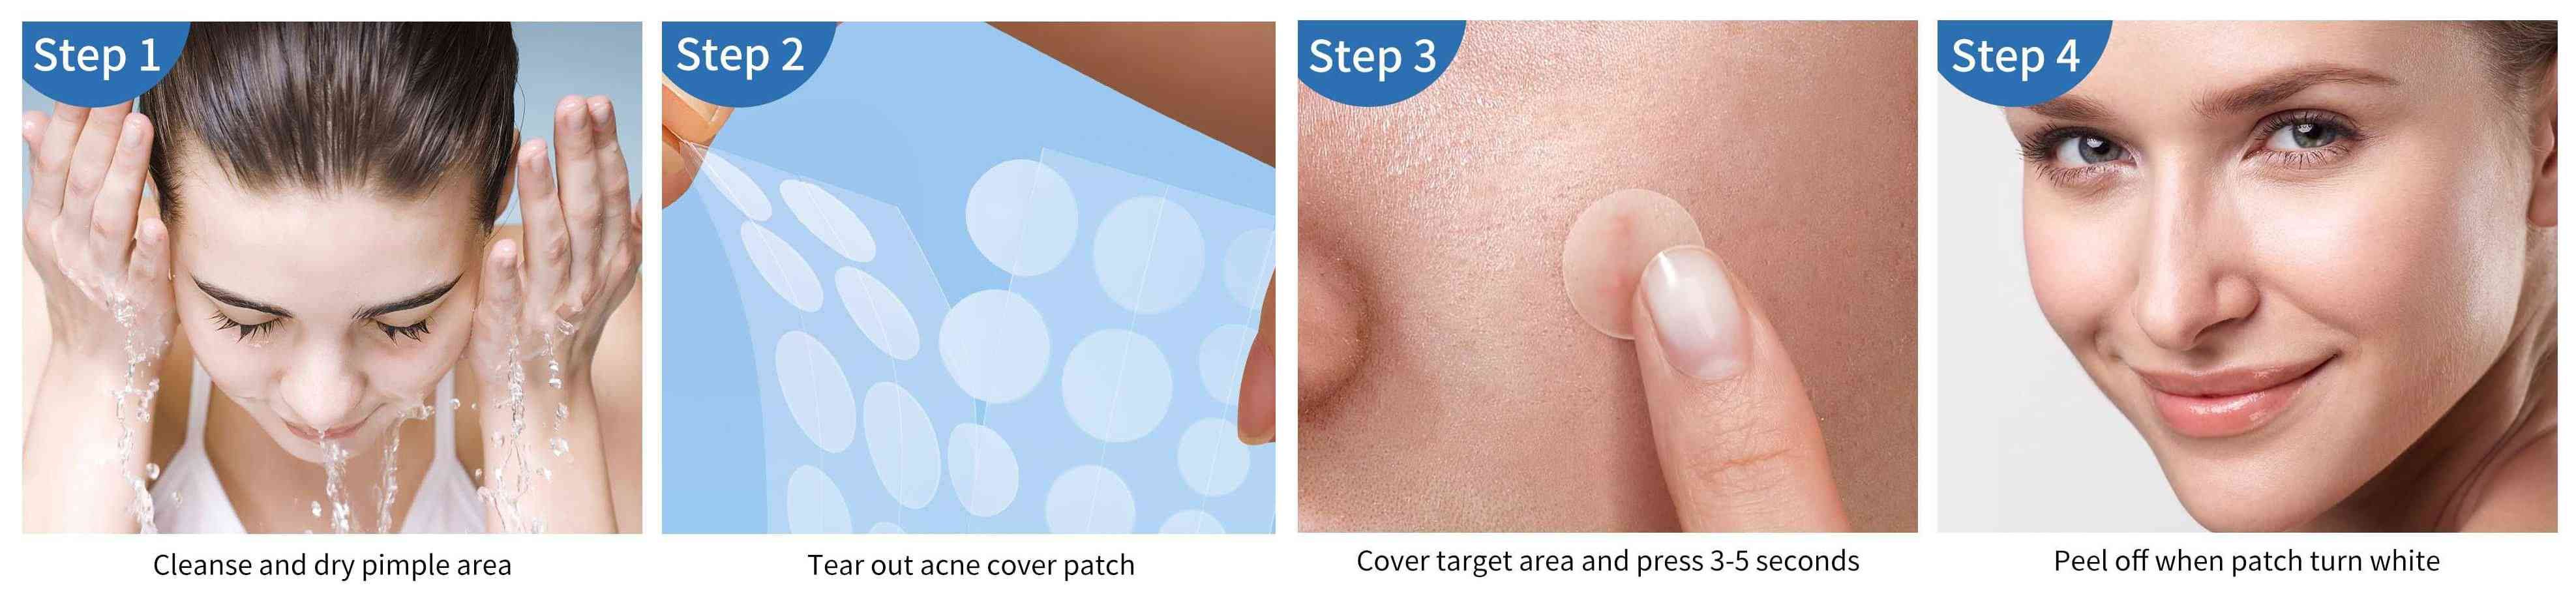
Step 1 — Cleanse and dry completely. Wash with a gentle cleanser and pat the area dry. Not mostly dry — completely dry. Any residual moisture on the skin prevents the patch adhesive from bonding properly. If your skin is still slightly warm from washing, wait another 30 seconds.
Step 2 — Tone if you use toner. A water-based toner is fine. Let it absorb fully before moving on. Oil-based or emollient toners will leave a film that interferes with adhesion — if that's what you use, skip it on the target spot or let it sit for at least 90 seconds.
Step 3 — Apply the patch. Peel the patch from the liner and place it directly over the blemish. Press down firmly for 10 seconds — body heat helps activate the adhesive. The patch should lie completely flat with no air bubbles at the edges. If the edges are lifting, the skin was either not dry enough or the patch is on a curved area where the size doesn't fit well.
Step 4 — Continue your routine around it. Apply serum, moisturizer, and SPF to the rest of your face as normal. Work around the patch — don't drag product over it, and don't press it down repeatedly.
Step 5 — Remove after 6–8 hours. Morning patches come off at night; night patches come off in the morning. That's the minimum useful window. If the patch is white when you peel it off, it absorbed fluid from the blemish. If it's still clear, either the blemish wasn't ready (no fluid to absorb yet) or the patch didn't adhere properly to bare skin.
Using Veilta patches? Browse the acne patch range →
Daytime vs overnight: does it make a difference?
The short answer: overnight is better, but daytime patches still do something.
The hydrocolloid needs sustained contact to draw meaningful fluid out of a blemish. In the first hour or two, the material is still warming up and beginning to absorb. Most of the visible whitening — the signal that the patch is working — happens between hours 3 and 8. A patch worn for only two hours during the day will absorb some fluid, but significantly less than one worn through the night.
That said, daytime patches serve a second purpose that overnight patches don't: they physically prevent touching and picking, which is one of the main causes of scarring and secondary infection. If you're prone to picking at spots, even a two-hour daytime patch reduces that risk.
For daytime use, ultra-thin or matte-finish patches are easier to wear under makeup. Standard patches have a raised, visible edge that's harder to conceal. If you're applying makeup over a patch, use a damp sponge rather than a brush — brushes catch the edges and lift the patch before it's done its job.
How to tell if a pimple patch is working
Three things to check when you peel it off:
The patch turned white or opaque. This is the clearest sign it worked. The white material is hydrocolloid that has absorbed fluid from the blemish. A patch that turns completely white within 4–6 hours was dealing with a well-developed blemish. One that takes the full 8 hours, or only turns partially white, was working on a less developed spot.
The blemish looks flatter. The osmotic action pulls fluid out and reduces the raised appearance. You may also see a small indentation where the patch sat — this is normal and fades within an hour.
The patch stayed completely clear. Two scenarios: the blemish was a blind pimple or early cyst with no surface opening (a standard patch can't reach the inflammation), or the patch didn't maintain contact with bare skin throughout. In either case, a microneedle patch is worth trying for deeper blemishes.
Common problems and fixes
The patch won't stick
The patch adhesive bonds to dry, product-free skin. If it's not sticking:
- Skin wasn't fully dry — pat the area again and wait 60 seconds before reapplying
- Moisturizer or serum was on the area — this is the most common cause; the hydrocolloid needs bare skin
- The patch is too large for the curve of your face around the nose or chin — try a smaller size
- The area is naturally oily — blot with a dry tissue before applying
The patch stayed clear after 8 hours
Two possibilities. Either the blemish has no surface opening yet (a blind pimple or early-stage cyst), in which case a standard hydrocolloid patch won't do much — a microneedle patch is better for this. Or the patch didn't make proper skin contact, in which case the hydrocolloid had nothing to absorb.
The patch left a red mark
Normal. The adhesive creates mild occlusion on the skin. The mark usually fades within 30–60 minutes. If your skin is consistently irritated by patches, look for latex-free or sensitive-skin formulations.
The patch fell off overnight
Patches applied to slightly damp or oily skin often don't last through the night. Cleanse, dry the area completely, and apply a new patch. Some people also find that pressing the patch down with a warm finger for 15–20 seconds instead of 10 improves overnight adhesion.
Pimple patches for specific blemish types
Not all spots respond to the same format. The American Academy of Dermatology classifies acne into non-inflammatory (blackheads, whiteheads) and inflammatory types (papules, pustules, nodules, cysts) — and that distinction matters for patch selection.
| Blemish type | Best patch format | Why |
|---|---|---|
| Whitehead / surface pustule | Classic hydrocolloid | Has a surface opening — hydrocolloid draws fluid out directly. Results usually visible after one overnight session |
| Blind pimple / cyst | Microneedle patch | Deep, closed blemish with no head. Dissolving needles carry salicylic acid or niacinamide below the skin surface where the inflammation is |
| Papule | Classic hydrocolloid | Red, raised spot with no visible head. The patch reduces inflammation and prevents picking, but don't expect dramatic whitening |
| Blackhead | Neither — use BHA | A different structure entirely (oxidised sebum in an open pore). Responds to salicylic acid exfoliants, not physical absorption |

Different blemish types need different approaches. Standard hydrocolloid patches work best on whiteheads with a visible surface.
Frequently asked questions
Do pimple patches go on before or after moisturizer?
Before moisturizer, always. Apply the patch to clean, dry skin right after toning — before any serum, moisturizer, or oil. Applying over moisturizer creates a layer that stops the hydrocolloid from sticking to the skin and absorbing anything from the blemish.
How long should you leave a pimple patch on?
At least 6–8 hours. Overnight is the most practical option for most people. The patch needs sustained contact to draw fluid out of the blemish. Wearing it for only 1–2 hours produces very little result.
Why did my pimple patch turn white?
The white colour means the hydrocolloid has absorbed fluid — pus, sebum, or wound exudate — from the blemish. A fully white, opaque patch has reached its absorption capacity and should be replaced with a fresh one. A patch that stays clear after several hours may mean the blemish wasn't ready, or the patch didn't adhere properly to bare skin.
Why is my pimple patch not sticking?
The most common causes: skin wasn't fully dry before application, moisturizer or serum was applied to the area first, or the patch was applied over a curved or oily part of the face. Pat the area completely dry, skip product on the target spot, and press the patch down firmly for 10 seconds using body heat to activate the adhesive.
Can you use a pimple patch on a blind pimple?
Standard hydrocolloid patches work best on open blemishes or whiteheads with a surface. For blind pimples — deep, closed cysts with no head — a microneedle patch is more effective. The tiny dissolving needles deliver active ingredients like salicylic acid or niacinamide below the skin surface where the inflammation is.
Can you put makeup over a pimple patch?
Yes, with caveats. Ultra-thin or matte-finish patches are designed for this. Standard patches have a visible raised edge that's harder to blend. Apply foundation lightly with a damp sponge rather than a brush, which can catch the edges. Avoid setting powder directly over the patch — it reduces adhesion.
Can you use toner before a pimple patch?
Yes — a water-based toner is fine, as long as the skin is fully dry before you apply the patch. Oil-based or emollient toners will interfere with adhesion. If you use an alcohol-based toner, wait at least 60 seconds for it to fully evaporate.
Can you reuse a pimple patch?
No. Once applied and removed, the adhesive and hydrocolloid material are spent. Reapplying it won't absorb anything further and the patch won't stick properly. Use a fresh patch each time.
Is it better to use a pimple patch during the day or overnight?
Overnight is better. Most of the visible absorption happens between hours 3 and 8 of wear — a daytime patch worn for 1–2 hours absorbs significantly less. That said, daytime patches still prevent touching and picking, which reduces scarring risk. For daytime use, ultra-thin or matte-finish patches are easier to wear under makeup.
How can you tell if a pimple patch is working?
The clearest sign is the patch turning white or opaque — that's hydrocolloid that has absorbed fluid from the blemish. The spot should also look flatter when you remove the patch. If the patch stayed completely clear after 8 hours, either the blemish had no surface opening (a blind pimple) or the patch lost contact with bare skin during wear.
Browse Veilta pimple patches
Veilta produces hydrocolloid acne patches, microneedle patches, and ultra-thin invisible patches — available individually and as part of skincare sets.
For brands looking to source or private label pimple patches: OEM sourcing guide →
